|
| pond supplies |
 |
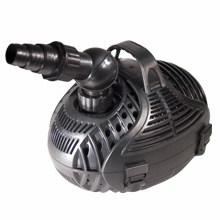 |
| Multi-Duty Pond Pump |
- High water flow
- Energy efficient and internal use
- Directional vortex impeller
- Fountain head kits included
- Thermally protected
- Encapsulated pre-filter
|
|
|
- Models
- Parts
- Installation
- Maintenance
| Item no. |
Flow rate |
max. head |
wattge |
UPC# 0069037 |
| DP 5000 |
1320 GPH |
5.2 ft. |
55 watt |
TBA |
| DP 7000 |
1716 GPH |
6.56 ft. |
70 watt |
TBA |
| DP 9000 |
1980 GPH |
8.85 ft. |
80 watt |
TBA |
| DP 12000 |
2772 GPH |
13.12 ft. |
130 watt |
TBA |
| DP 15000 |
3300 GPH |
14.76 ft. |
180 watt |
TBA |
| DP 18000 |
3828 GPH |
21 ft. |
250 watt |
2966 6 |
| DP 20000 |
4356 GPH |
23 ft. |
350 watt |
TBA |
|
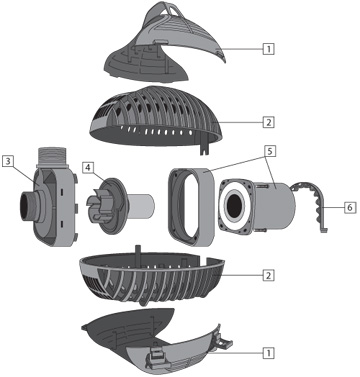
- Locking pre-filter
- Main pre-filter
- Volute
- Impeller
- Motor
- C-clamp
- Barbed pipe adapter
- Universal elbow
- Coupler
- Water bell head
- Three tier head
- Uplift tubes (3)
- Valve and water diverter
- Diverter cap
- Barbed flexible adapter
- 1 1/4” threaded pump to uplift tubes adapter
- Fountain head coupler
|
 |
|
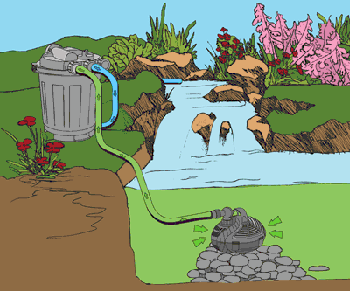
SUBMERSED
- Place pump in the desired location. If pump is placed in a pond, raise the pump off the bottom of the pond by a minimum of 6 inches.
- Use Teflon tape to connect the universal elbow or coupler to the output of the pump.
- Place the o-ring onto the barbed pipe adapter. Then, use the Teflon tape to hand tighten the barbed pipe adapter to the universal elbow or coupler. See diagram A.
- Connect the flexible tubing to the barbed pipe adapter. Ensure water tightness with a hose clamp.
- Connect to filtration or water feature.
FOUNTAIN HEAD
- Place pump in the desired location. If pump is placed in a pond, raise the pump off the bottom of the pond by a minimum of 6 inches.
- Use Teflon tape to connect the universal elbow or coupler to the output of the pump.
- Install the fountain head properly. See details in diagram B.
- The diverter valve enables water flow to be directed to either a water feature, TerminatorTM UVC Sterilizer, or a pressure pond filter.
If you have problem opening PDF file from Internet Explorer,
please try Firefox or right click on the link and select Save Target As and save the PDF file in your computer. |
If water decreases, it is a clear sign that debris is in the impeller or the pre-filter is clogged. It is the aquarist’s sole responsability to ensure the pump is maintained. Failure to properly maintain the pump will cause permanent damage to the pump.
- Recommended routine maintenance: every 30 days.
- Tools required: Philips screw driver.
- Disconnect the pump from the GFCI (Ground Fault Circuit Interrupter) power supply prior to removing the pump from the water.
- Release all four latches from the pre-filter. Rinse all the debris out of the pre-filter.
- Remove the C-clamp.
- Loosen the four large screws on the volute. Then, remove the volute.
- Once the volute is removed, clean it well.
- Remove the impeller and clean it well. Verify the impeller is free of all dirt and debris.
- Once cleaned, place the impeller back into the motor. Guide holes on the impeller plate, so they match with the pins on the volute. The impeller should sit flush on the volute.
- Reassemble. If necessary add a small amount of silicone lubricant to the gasket in the volute to ensure a proper seal.
- Start the ViaAqua® Multi-Duty Pond Pump™.
|
|
|
|
|