Terminator™ UVC Sterilizer (optional) for crystal clear water
Multiple types of bio foam filtering media for beneficial aerobic bacteria
Reverse flow
Backwash valve
Long lasting ceramic biological media
Quad-action filtration for maximum efficiency
Specifications
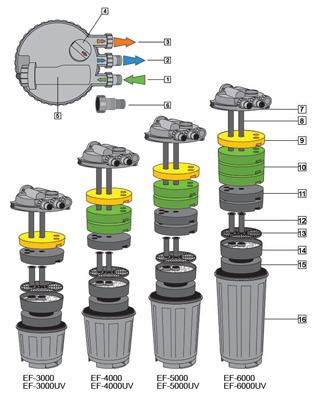
Models
Parts
Installation
Maintenance
PRESSURE POND FILTER with UVC Sterilizer The ViaAqua® Terminator™ UVC Sterilizer features a PL bulb. The sterilizer uses a quartz sleeve to maintain the bulb temperature, thus allowing 95% of the UVC radiation to sterilize the water. The internal burning chamber is designed for maximum contact time, which produces more UVC radiation than comparable UVC units. The increased of contact time exposes virtually all organic, single celled algae and eradicates the most harmful microoganisms.
TERMINATOR™ UVC Sterilizer
Water resistant ballast
E-39 connections
Quartz sleeve
PL compact UVC bulb
Safety switch built into the cap
Indicator light
Regular Model
Item no.
Rec.
pump size
dimension
UVC
ID pipe size
filtering capacity
Filter height
UPC# 0069037
EF-3000
700-1300 GPH
15" x 14.25"
n/a
1.25 in.
or
1.5 in.
15.5 L
14.25 in.
2952 9
EF-4000
1300-2100 GPH
15" x 18.25"
21.5 L
18.25 in.
2954 3
EF-5000
1300-3000 GPH
15" x 22.25"
27.5 L
22.25 in.
2956 7
EF-6000
1300-4000 GPH
15" x 26.25"
33.5 L
26.25 in.
2958 1
UVC Model with UV Sterilizer
Item no.
Rec.
pump size
dimension
UVC
ID pipe size
filtering capacity
Filter height
UPC# 0069037
EF-3000UVC
700-1300 GPH
15" x 14.25"
5 w
1.25 in.
or
1.5 in.
15.5 L
14.25 in.
2953 6
EF-4000UVC
1300-2100 GPH
15" x 18.25"
9 w
21.5 L
18.25 in.
2955 0
EF-5000UVC
1300-3000 GPH
15" x 22.25"
9 w
27.5 L
22.25 in.
2957 4
EF-6000UVC
1300-4000 GPH
15" x 26.25"
9 w
33.5 L
26.25 in.
2959 8
Intake
Ouput
Backwash/sludge removal
Backwash knob
Terminator™ UVC Sterilizer (optional)
Barbed fitting
Lid retainer clamp
Intake & Output tube
Fine bio foam
Medium bio foam
Coarse bio foam
Intake & output flares
Ceramic bio strainer
Ceramic bio chamber with media
Coarse prefilter
Filter body
TYPICAL OPERATION
For proper filtration, operate the pressure pond filter 24 hours a day, year round.
Start the ViaAqua® pond pump.
Verify that all seals and connections are not leaking.
BACKWASH OPERATION
Remove the cap from the backwash/drain port.
Connect a barbed fitting with a piece of tubing and secure with a hose clamp.
To activate backwash, turn off the pond pump and switch the flow control knob so that the arrow points to the backwash/drain discharge port.
Turn the pond pump back on.
Drain the water into a sewage system or garden.
Backwashing filter should be performed at least once a week.
The filter needs to be cleaned when: - Dirty/cloudy water is in the filter.
- Reduced water flow.
If you have problem opening PDF file from Internet Explorer,
please try Firefox or right click on the link and select Save Target As and save the PDF file in your computer.
FILTER SPONGES When backwashing, if the filter does not produce expected results, it is necessary to clean or replace foam media. This should be performed at least once a season. However, this is not a rule for pond and outdoor environments vary thus more frequent cleaning may be required.
Unplug the Terminator™ UV Sterilizer and turn the pond pump off.
Disconnect the barbed fitting from the filter.
Flip out safety lock and remove lid retainer clamp.
Remove the lid of the filter. Handle with care. The UV bulb and quartz sleeve is made of glass.
Remove the intake and output flares.
Remove and rinse foam pads. Replace them if necessary.
Remove the bio-chamber and rinse well with pond water only. Biological media beneficial bacteria will be killed if tap water is used to rinse.
Remove and rinse pre-filter foam pads. Replace them if necessary.
Rinse and clean the filter body.
Place the filtering media back in their original locations. Replace intake and output flares.
Replace o-ring and verify that it is clean. We recommend using a small amount of silicone lubricant on the o-ring to ensure a proper seal.
Secure lid with lid retainer clamp. The lid retainer clamp must be aligned so that the notches in the top of the clamp fit under the intake and discharge port.
Filter is ready to use. See installation instructions.
REPLACEMENT OF UV BULB (UV Model)
Follow all the safeguards and warnings of the manufacture.
Before doing any maintenance on the UV sterilizer, the power supply and water supply must be disconnected.
Only in rare situations does the quartz sleeve ever have to be removed. If necessary loosen screws carefully, then remove the quartz sleeve. If excess force is used the quartz sleeve will break. After removed, use a soft clean cloth to gently remove any excess grim and/or debris. Reassemble using a small amount of silicone lubricant placed on the o-ring prior to sliding it into the main body of the UV sterilizer.
The UV bulb needs to be replaced every 8,000 to 9,000 hours. This will ensure optimum performance.
The efficiency of the Terminator™ UV Sterilizer depends on the duration the UV light is in contact with water. Thus the rate of water flow, not the way the water travels, will relate to the efficiency of the UV sterilizer.