|
| Aquarium reactors |
 |
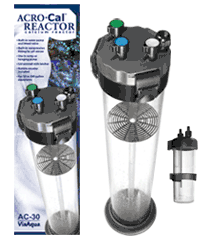 |
| Acro-Cal™ Calcium Reactor |
- Built-in water pump and bleed valve
- Use in-sump or hanging
- Easy twist off top
- Bubble counter included
- Built-in water pump
- Built-in compression fitting for pH sensor
|
|
|
| |
- Specifications
- Models
- Parts
- Installation
- Maintenance
| ViaAqua® Acro-Cal™ Calcium Reactor offers a simple and convenient solution for maintaining calcium and alkalinity in your reef tank, both being the backbone to a successful thriving reef environment. How does it works? CO2 is used to lower the pH in the reaction chamber. When the PH is lowered to 6.5-6.8 the circulating water and low pH begins to break down the media creating effluent water that is saturated with carbonates and calcium that continuously drip back to the aquarium. After the initial setup, the calcium reactor requires minimal maintenance. A calcium reactor is almost a necessity for tanks heavily stocked with stony coral, where calcium and alkalinity demands are high and will promote coral line algae growth. Acro-Cal™ Calcium Reactor provides a steady of calcium by using CO2 to dissolve media in the reactor and, thus, releasing calcium into your water. The effluent released also acts as a buffer to stabilize kH. |
| Item no. |
Description |
dimension |
Capacity |
UPC# 0069037 |
| AC-10 |
Acro-Cal Calcium Reactor |
4" W x 15" H |
10 -75 gal. |
006903729079 |
| AC-30 |
Acro-Cal Calcium Reactor |
5.5" W x 22.75" H |
50 -200 gal. |
006903728041 |
| RAC-29222 |
Media Sponge (AC-10) 2 pk. |
- |
- |
006903729228 |
| RAC-30228 |
Media Sponge (AC-30) 2 pk. |
- |
- |
006903730228 |
| RAC-29345 |
Bubble Counter Replacement |
- |
- |
006903729345 |
|
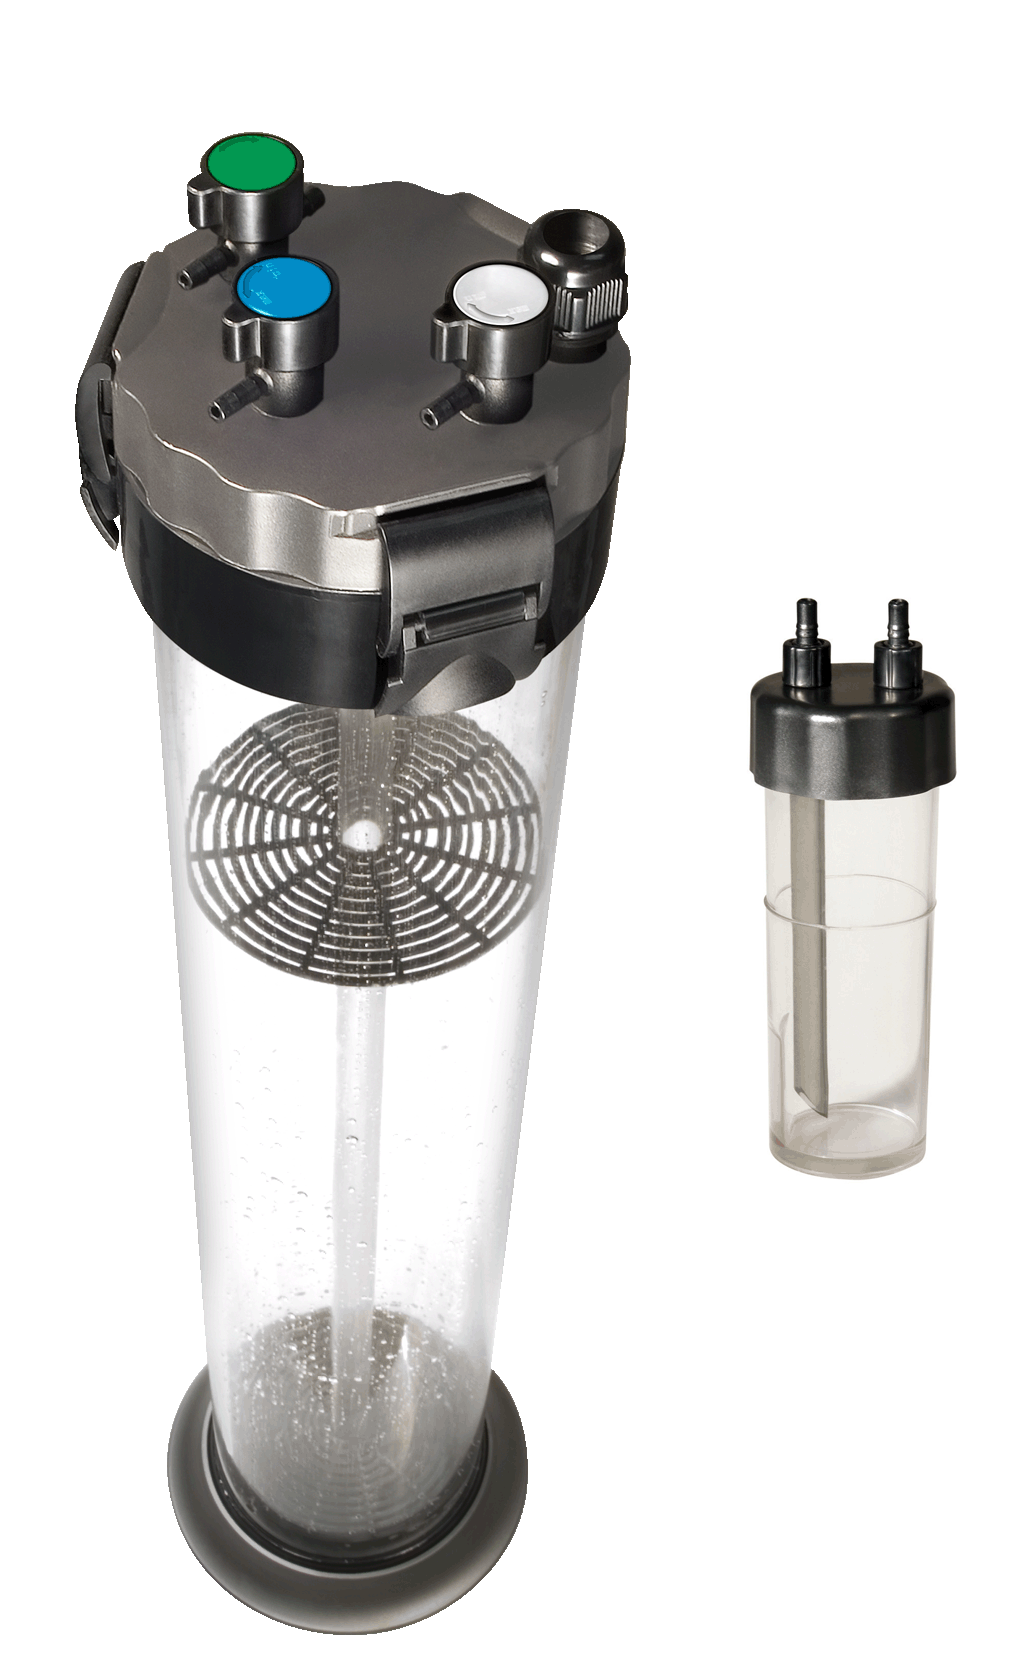
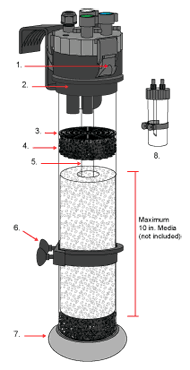
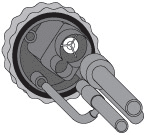
| AC-10 PART LIST |
| Items included |
|
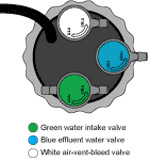
Top view |
1. Green water intake valve
2.
White air-vent-bleed valve
3.
Blue effluent water valve
4. Hanger
5. Support grip
6. Sponge
7. Stand pipe
8. Suction cup bracket
9. Base
10. Bubble counter |
Items required for
installation
(not included): |
• CO2 source
• CO2 regulator
• CO2 check valve
• Silicone tubing
• Oceanpure™ Reef
Calcium media
• pH controller
(recommended) |
|
 |
|
Green Water intake valve
Blue Effluent water valve
White Air-vent-bleed valve |
|
| |
|
|
|
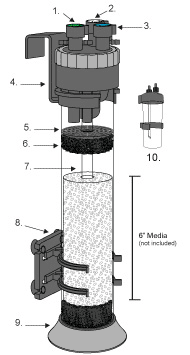
| AC-30 PART LIST |
| Items included |
 |
Top view |
1. Latch
2.
Hanger
3.
Support grid
4.
Sponge
5.
Stand pipe
6. Suction cup bracket
7. Base
8. Bubble counter
|
| Items required for installation
(not included): |
• CO2 source
• CO2 regulator
• CO2 check valve
• Silicone tubing
• Oceanpure™ Reef
Calcium media
• pH controller
(recommended)
|
|
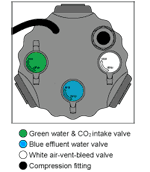 |
Green Water intake and CO2 intake valve
Blue Effluent water valve
White Air-vent-bleed valve
Compression fitting |
|
|
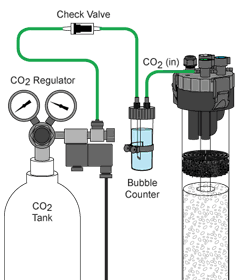
FOR AC-10 AND AC-30
Initial set-up for the CO2/Water intake (in) is shown in the diagram as:
Attach the silicone tubing from the CO2 regulator to a check valve to the bubble counter and to the CO2 green water intake valve.
For complete installation of the Acro-Cal™ Calcium Reactor AC-10 and AC-30, please download the booklets below. |
 |
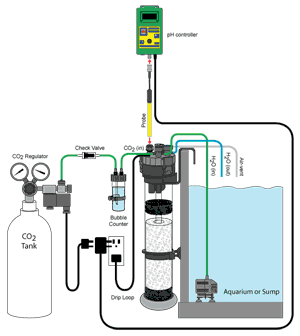
pH Controller and Probe Installation
Remove the rubber plug. Slide the compression fitting over the sensor probe. Insert probe into the compression fitting and hand tighten nut to seal.
Two types of pH controller:
a. pH monitor: Mount the control box so that the LCD screen is visible. The read out should have a pH of 6.5-7.5 ideally.
pH should be maintained between 6.5-6.8. If pH is too high, decrease water flow and/or increase CO2.
b. pH controller: Unit require a CO2 regulator that has an electronic solennoid. Plug the solenoid into the pH controller. Turn on CO2 to a bubble for a second. Set desired pH between 6.5-7.5 on the controller, the solenoid and controller will now monitor CO2 by adding CO2 when needed. |
 |
If you have problem opening PDF file from Internet Explorer,
please try Firefox or right click on the link and select Save Target As and save the PDF file in your computer. |
| Impeller Maintenance |
|
- Routine manteinance is required to ensure the maximum performance and the longevity of the ViaAqua® Acro-Cal™ Calcium Reactor.
- For proper operation of the Calcium Reactor, clean the impeller once a month.
a) Remove the top of the calcium reactor.
b) Remove the impeller cover.
c) Remove the impeller and shaft. With a small brush clean the inside of the impeller and impeller cover.
d) If the impeller does not spin easily on the shaft, soak the unit with 3:1 vinegar solution. Remove all calcium residue between the shaft and rotor.
e) Reassemble.
- Replace calcium media every 3 to 6 months depending on the usage.
- Clean the ViaAqua® Acro-Cal™ Calcium Reactor every 3 to 6 months along with the water pump.
- Make sure all parts are free of debris and calcium build-up.
|
 |
|
PH Controller (recommended) is used to keep the effluent water at a preset level.
Items needed:
- pH controller
-
CO2 regulator with solenoid
-
Container for the effluent water (must fit pH probe)
Installation:
- Secure the container to the pH probe.
- Plug the electronic solenoid into the pH controller.
- Follow pH controller manufacture instructions for proper unit setting.
If you still have questions about how to install or maintain the Acro-Cal™ Reactor, consult your local fish store. Continue monitoring the water quality (calcium, alkalinity, effluent pH) to ensure a properly working Calcium Reactor. |
|
|
|
|